

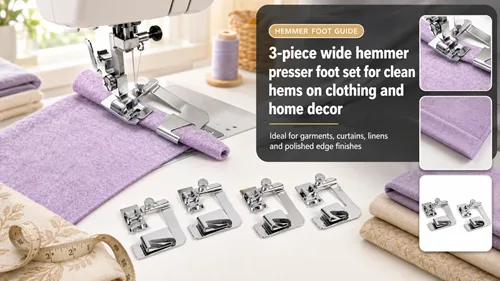
A 3-piece wide hemmer presser foot set can speed up repetitive hems when the foot width, fabric behavior, and starting technique all match the project. The attachment works by guiding a folded edge while the machine stitches it down, but it is not automatic: the fabric still has to enter the guide evenly, the fold must stay consistent, and bulky seams need special handling. For garment makers and home decorators, the biggest advantage comes on long, repeatable edges such as skirts, table linens, lightweight panels, and selected curtain hems.
How To Evaluate The 3-Piece Wide Hemmer Presser Foot Set
Wide hemmers work best when the raw edge has a stable shape. Very soft, bias-cut, stretchy, or bulky fabric can collapse, curl, or resist the guide. Before committing a garment, test the same grain direction and number of layers. A beautiful sample on straight quilting cotton does not prove the foot will behave the same way on a curved rayon skirt.
Think about seam intersections before you start. Side seams, facings, and thick joins can change the height entering the guide. Grade bulky allowances, press where appropriate, and be ready to transition out of the hemmer foot for a short difficult section rather than forcing the attachment over a ridge.
Features And Setup That Matter In Real Use
Match The Foot Width To The Finished Hem
Measure the visible hem you want after folding. A wider foot is useful for some garments and home décor, while a narrower option can suit lighter edges. The best width is the one that controls the fold without swallowing too much fabric or creating unnecessary bulk.
Prepare A Straight Clean Edge
Trim frayed threads and correct a badly uneven edge before feeding it into the guide. Small irregularities can multiply over a long curtain or skirt hem because the fold gradually shifts as more fabric passes through the attachment.
Start The Fold Before The Guide
Many wide hemmers feed more reliably when the first short section is folded and secured manually. Stitch a few initial stitches if needed, raise the foot, position the folded edge into the guide, then continue while maintaining gentle, even alignment.
Control Curves And Crossed Seams
Gentle curves may work with careful feeding, but tight curves and thick seam crossings can distort the fold. Slow down before the difficult area and stop if the edge begins to escape the guide. A short manually folded section is better than a visibly twisted hem.
Build A Workflow Around The Project, Not The Marketing Label
Compare wide hemmer foot sizes by the finished fold they create, not by appearance alone. Mark the desired hem depth on a scrap, run each foot on the same fabric, and keep the sample labeled so you can pick the correct width quickly when the project returns.
Good folded hem attachment technique depends on feeding the edge into the guide at a steady angle. Keep the fabric supported in front of the machine and use your left hand to prevent sideways drag while your right hand maintains the amount of fabric entering the curl or fold channel.
A wide hem foot for garments is most useful on long accessible edges such as skirts, selected sleeves, simple robes, and casual garments. Test near side seams and curved sections first because the attachment may need a different approach where the garment structure becomes bulky.
When using a curtain hemming presser foot, support the weight of the panel so it does not pull the fold out of the guide. Large home décor pieces can create more feeding trouble from gravity and table drag than from the hem itself.
Treat the hemmer as a consistent edge folding tool only after the fabric has proven it can feed evenly. If the edge repeatedly slips out, pre-press the fold, use a different width, or switch to a standard foot with a seam guide rather than fighting the attachment.
The most useful hemmer foot setup tips begin with compatibility. Confirm that the foot attaches correctly, centers under the needle, and clears the stitch plate before sewing. Turn the handwheel through a full stitch cycle after installation so the needle cannot strike the foot.
Test The Hemmer On A Full-Length Scrap
- Cut a strip long enough to reveal whether the fold drifts over time.
- Use the same fabric grain, needle, thread, and stitch length planned for the project.
- Create the starting fold and feed it into the selected hemmer width.
- Sew slowly for the first section while watching the edge enter the guide.
- Cross one sample seam allowance if the finished project contains seam intersections.
- Press and inspect the hem from both sides before choosing the production setup.
Choose The Hem Method By Fabric Behavior
| Fabric Situation | Best Starting Approach | Main Risk |
|---|---|---|
| Stable woven edge | Wide hemmer foot | Gradual drift |
| Light slippery fabric | Pre-press and test | Edge escapes guide |
| Bulky seam crossing | Manual transition | Foot rides over ridge |
| Long curtain panel | Support fabric weight | Panel pulls sideways |
| Tight curve | Standard foot may be better | Fold twists |
Common Mistakes That Reduce Results
- Starting with a frayed uneven edge
- Pulling the fabric through the guide
- Ignoring foot and shank compatibility
- Forcing the attachment over bulky seam intersections
- Choosing a width without testing the finished look
A hemmer foot is a guide, not a substitute for fabric preparation. When the edge is trimmed, supported, and fed at a consistent angle, the attachment can save substantial time. When the fabric fights the guide, change the method instead of accepting a poor hem.
Check Manufacturer Guidance Before Final Setup
For broader presser-foot categories and current accessory guidance, review the SINGER accessories overview. Always confirm the attachment system for your exact machine before buying a foot that is described as universal.
Use The 3-Piece Wide Hemmer Presser Foot Set For Repeatable Long Edges
The 3-piece wide hemmer presser foot set is most effective when you choose the width intentionally and test the complete path the fabric must travel. A long clean edge can become much faster once the guide is feeding correctly.
Keep labeled samples for your most common garment and home décor fabrics. Over time, those samples become a practical reference for foot width, stitch length, and starting technique, making the 3-piece wide hemmer presser foot set faster to set up and more predictable to use.
Frequently Asked Questions
Do wide hemmer feet work on all fabrics?
No. Stable woven fabrics are usually easier, while very stretchy, slippery, bulky, or sharply curved edges may need another hemming method.
Should I press the hem before using a hemmer foot?
It can help on difficult fabrics. Some hemmers are designed to form the fold, but a short prepared start or light pre-press can make feeding more reliable.
Can I sew over a side seam with the hemmer foot?
Sometimes, but bulky crossings can disrupt the guide. Grade the seam or transition manually if the foot cannot pass smoothly.
How do I know which width to use?
Make labeled samples using the actual project fabric and compare the finished hem depth and appearance.
Why does the fabric keep coming out of the guide?
The edge may be entering at the wrong angle, the fabric may be dragging, the width may be unsuitable, or the material may be too unstable for that attachment.
