

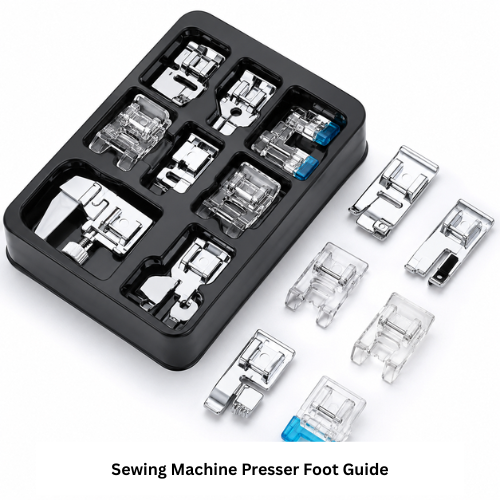
Choosing the right sewing machine presser foot can make specific sewing tasks easier and more precise. Different presser feet are designed for jobs such as installing zippers, sewing buttonholes, creating hems, quilting layers, edge stitching, and general-purpose sewing. The best option depends on the project, fabric, stitch type, and your sewing machine.
Presser feet are not universally compatible with every sewing machine. Before buying, check the machine’s shank type, attachment system, needle position, stitch width, and whether an adapter is required. Matching the foot correctly helps prevent poor fabric feeding, incorrect stitch placement, or contact between the needle and presser foot.
Quick Answer: A sewing machine presser foot should match both your machine and the task you want to perform. Standard feet handle everyday seams, while specialized feet such as zipper, buttonhole, hemming, and walking feet are designed to make particular sewing techniques easier and more consistent.
Common Sewing Machine Presser Feet and Their Uses
| Presser Foot Type | Best Used For | Main Benefit | Check Before Buying |
|---|---|---|---|
| Standard / Zigzag Foot | Everyday straight and zigzag stitching | General-purpose fabric control | Needle opening and supported stitch width |
| Zipper Foot | Zippers, piping and close edge stitching | Lets the needle sew close to an edge | Left/right needle position and attachment fit |
| Buttonhole Foot | Making consistent buttonholes | Helps guide buttonhole length and placement | Machine buttonhole system and compatibility |
| Walking Foot | Quilting, layered fabrics and matching patterns | Helps multiple fabric layers feed more evenly | Shank type and mounting mechanism |
| Rolled Hem Foot | Narrow and rolled hems | Folds the fabric edge while stitching | Hem width and suitable fabric weight |
| Blind Hem Foot | Blind hems on garments and home décor | Helps keep visible stitches minimal | Stitch compatibility and guide adjustment |
| Overcasting / Overedge Foot | Finishing raw fabric edges | Helps guide fabric for cleaner edge finishing | Stitch width and needle clearance |
Choosing Presser Feet for Different Sewing Projects
The right presser foot depends on the sewing technique, fabric, and level of control you need. Instead of choosing a foot only by its name, match its function to the specific task and confirm that it fits your sewing machine.
For everyday sewing: A standard or zigzag foot is suitable for most straight stitches, zigzag stitches, and general seam construction. It is usually the most frequently used presser foot for basic sewing.
For zippers and piping: A zipper foot allows stitching closer to zipper teeth, piping, or raised edges. Check whether your machine supports left, right, or adjustable needle positions before sewing.
For buttonholes: A buttonhole foot helps control the size and placement of buttonholes. Some machines use automatic buttonhole systems, so the correct foot should match the machine’s buttonhole function.
For hems: Rolled hem and blind hem feet can make edge finishing easier. Rolled hem feet fold narrow fabric edges while stitching, while blind hem feet help guide fabric when creating less-visible garment hems.
For quilting and layered fabrics: A walking foot can help feed several fabric layers more evenly and reduce shifting. Because walking feet have their own fit and setup requirements, compatibility with the machine should always be confirmed before installation.
For raw-edge finishing: An overcasting or overedge foot can help guide fabric while using compatible edge-finishing stitches. It can improve control at the fabric edge, but it does not turn a standard sewing machine into a serger.
Before using any specialized presser foot, test the setup on scrap fabric and manually turn the hand wheel through a stitch cycle to confirm adequate needle clearance.
How to Check Presser Foot Compatibility and Install It Safely
A presser foot should match the attachment system and stitch capabilities of your sewing machine. Even when two feet look similar, differences in shank height, mounting method, needle opening, or stitch width can affect compatibility.
Before installing a presser foot:
- Switch off and unplug the sewing machine before removing or installing attachments.
- Raise the needle to its highest position and lift the presser foot.
- Check whether the machine uses a low-shank, high-shank, slant-shank, snap-on, or another attachment system.
- Confirm whether the presser foot requires an adapter, holder, screw, or other mounting component.
- Make sure the needle opening is wide enough for the stitch and needle position you plan to use.
- After installation, slowly turn the hand wheel through a complete stitch cycle before using the foot pedal.
- Stop immediately if the needle approaches or touches the presser foot.
Always follow the sewing machine and presser-foot manufacturer instructions when the installation method or compatibility is unclear.
Common Presser Foot Problems and How to Fix Them
Presser-foot problems are often related to installation, compatibility, needle position, stitch settings, or fabric feeding. If stitching does not look correct, stop the machine and check the setup before continuing.
Needle hitting the presser foot: Stop sewing immediately. Check that the foot is installed correctly and that the selected needle position and stitch width fit within the foot opening.
Fabric not feeding properly: Confirm that the presser foot is fully lowered, the feed dogs are engaged, and the foot sits level on the fabric. Very thick seams or unsuitable foot pressure may also affect feeding.
Fabric shifting or layers moving unevenly: Recheck the foot type and project setup. Layered fabrics may need additional pinning, basting, or a specialized foot designed for more even feeding.
Uneven stitching near an edge: Make sure the fabric guide, edge guide, or presser-foot position is correctly aligned. Test the stitch on scrap fabric before sewing the final project.
Presser foot feels loose: Check the snap-on holder, screw, adapter, or mounting connection. Do not continue sewing until the attachment is secure.
Presser Foot Maintenance
Keep presser feet clean and inspect them periodically for lint, thread, rough edges, or damaged moving parts. Wipe or brush debris from grooves, guides, hinges, and attachment points after use. Only lubricate a moving attachment if the manufacturer specifically recommends it.
Store presser feet with their adapters, screws, and guides together so the correct parts are available when you need them.
Sewing Machine Presser Foot Buying Checklist
Before buying a presser foot, check these points:
- Confirm the exact sewing machine brand and model.
- Identify the machine’s shank or attachment type.
- Check whether an adapter, holder, or mounting screw is required.
- Match the presser foot to the sewing task you actually need.
- Verify the supported needle positions and maximum stitch width.
- Make sure the foot opening provides enough needle clearance.
- Consider the fabrics and thicknesses you sew most often.
- Check whether guides, adapters, screws, or other required parts are included.
- Review installation instructions and compatibility information.
- Inspect the foot for smooth contact surfaces and secure moving parts.
- Check replacement-part availability if the attachment has removable components.
- Review warranty and return terms when compatibility is uncertain.
A larger presser-foot set is not automatically a better choice. A smaller group of compatible feet that match your regular projects can be more useful than a large set containing attachments you rarely use.
Final Thoughts
The best sewing machine presser foot is the one that fits your machine correctly and makes a specific sewing task easier to control. Standard, zipper, buttonhole, hemming, walking, and overcasting feet each serve different purposes, so choosing by function is more useful than simply buying the largest set available.
Before purchasing or installing a presser foot, confirm the machine model, attachment system, needle clearance, supported stitch width, and any required adapters. Test new feet slowly on scrap fabric before using them on a finished project.
A small collection of compatible presser feet matched to the sewing techniques you use most often can provide more practical value than owning many attachments that do not suit your machine or projects.
Frequently Asked Questions About Sewing Machine Presser Feet
A presser foot is the attachment that holds and guides fabric while the sewing machine forms stitches. Different presser feet are designed for specific tasks such as general sewing, installing zippers, making buttonholes, hemming, quilting, and finishing fabric edges.
No. Presser feet are not universally compatible with every sewing machine. Compatibility can depend on the machine model, shank type, attachment method, needle position, stitch width, and whether an adapter is required.
Start by checking your sewing machine brand and exact model. Then confirm the shank or attachment type, supported stitch width, needle opening, and whether the foot requires an adapter, holder, or mounting screw.
A zipper foot is designed to sew close to zipper teeth, piping, and raised edges. Before sewing, confirm that the foot works with your machine’s available needle positions and provides enough needle clearance.
A walking foot can be helpful when sewing quilts or multiple fabric layers because it can reduce shifting between layers. It is not required for every quilting project, and correct basting, machine settings, and compatibility still matter.
The needle may hit the presser foot if the foot is installed incorrectly, the selected needle position is incompatible, or the stitch width exceeds the available opening. Stop sewing immediately and check the installation, needle position, and stitch settings before continuing.
