

Sergers & Overlock Machines
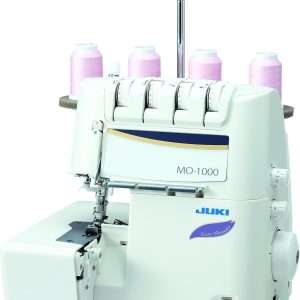
JUKI MO-655 2/3/4/5 Thread Serger Sewing Machine with Pearl Finish


Sergers & Overlock Machines


Sergers & Overlock Machines


Sergers & Overlock Machines


Sergers & Overlock Machines


Sergers & Overlock Machines


Sergers & Overlock Machines
Sergers & Overlock Machines


Sergers & Overlock Machines
Detail Description
Mastering the Juki Overlock Sergers: A Comprehensive Guide for Seamstresses
Are you ready to take your sewing skills to the next level? If so, mastering the Juki Overlock Serger is a game-changer for any seamstress. This powerful machine trims and finishes seams beautifully and adds that professional touch to all your projects. Whether you’re a seasoned pro or just starting, understanding this versatile tool can open creative possibilities. Dive into our comprehensive guide designed specifically for those eager to unlock the full potential of their Juki Overlock Serger! Let’s get started on this exciting journey together.
Understanding the Different Features and Functions
The Juki Overlock Serger boasts various features that can elevate your sewing game. One standout function is its ability to sew, trim, and finish edges in a single step. This not only saves time but also ensures clean and professional-looking seams.
Another key feature is the adjustable stitch length and width. Tailoring these settings allows you to create different finishes for various fabrics—whether you’re working with delicate lace or sturdy denim.
Pay attention to the differential feed mechanism. It helps prevent puckering by adjusting how fabric feeds through the machine. This is particularly useful when handling stretchy materials like knits or lightweight chiffon.
Many models come equipped with multiple threading options that enhance versatility. The color-coded threading guides make setup simple even for beginners, allowing you to switch between projects effortlessly without frustration.
Setting Up Your Juki Overlock Serger
Setting up your Juki Overlock Serger is straightforward and ensures you’re ready to sew confidently. Start by giving your machine a clean, flat surface. This will help you work comfortably and keep everything organized.
Next, unpack the serger and check for all included accessories. Please familiarize yourself with the manual containing valuable information tailored specifically for your model.
Threading might seem daunting at first. However, follow the color-coded guides on the machine to make this easier. Always use high-quality threads to achieve optimal results.
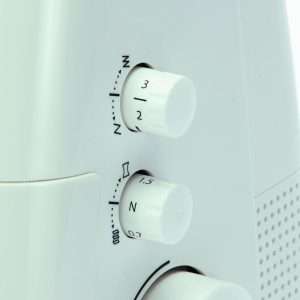
Don’t remember to set settings according to the fabric type! Adjust these controls as needed; they significantly affect stitch quality.
Plug in the machine and power it on. Before diving into your projects, a quick test run will let you know if everything is working correctly.
Step-by-Step Guide on How to Use Your Juki Overlock Serger
To start using your Juki overlock serger, ensure you have threaded it correctly. Refer to the manual for threading diagrams specific to your model. This step is crucial for achieving smooth stitching.
Next, adjust the stitch settings according to your fabric type. Use the dial controls on the machine’s front panel to modify tension and stitch length. Experiment with these settings on scrap fabric until you find what works best.
Once everything is set, position your fabric under the presser foot. Gently lower the foot and engage the pedal slowly to begin sewing. Watch how the blades cut through excess material while simultaneously finishing edges.
I am trying to remember speed control! Familiarize yourself with how fast or slow you want to sew based on your comfort level and project requirements. As you practice, you’ll gain confidence in effortlessly mastering edge finishes.
Troubleshooting Tips for Common Issues
Issues may arise when using your Juki overlock serger. One common problem is skipped stitches, which can happen due to improper threading or a worn needle. Re-threading the machine with a fresh thread often resolves the issue.
Another frequent complaint is that the fabric does not feed correctly. Check if the presser foot pressure needs adjusting. Sometimes, switching to a different foot helps, too.
If you notice frayed edges on your seams, it could indicate that your cutting blade needs adjustment or replacement. Check for sharpness regularly to ensure clean cuts.
If threads are tangling underneath the fabric, inspect your tension settings. A quick tweak can make all the difference in achieving smooth and even stitching without frustration.
Maintenance and Care for Your Juki Overlock Serger
Regular maintenance is essential to keeping your Juki overlock serger running smoothly. Start by cleaning the machine after every few uses. Dust and lint can accumulate around the feed dogs and in the looper area, affecting performance.
Use a soft brush to remove debris gently. Avoid using compressed air, as it may push lint further inside.
Oil your serger according to the user manual’s recommendations. A well-lubricated machine runs quieter and lasts longer.
Check for thread tension regularly; improper tension can lead to uneven stitches or fabric damage.
Inspect blades for dullness or chips, replacing them when necessary for clean fabric cuts.
Always cover your serger when not in use. It protects against dust accumulation and ensures you’re ready to sew whenever inspiration strikes.
Bonus Tips and Tricks for Mastering the Juki Overlock Serger
Mastering your Juki Overlock Serger can genuinely elevate your sewing projects. Here are some bonus tips and tricks to help you get the most out of your machine.
Familiarize yourself with different stitch types. The Juki overlock serger offers various settings for rolled hems, flat locking, and more. Experiment with these options on scrap fabric before starting a new project.
Always keep extra needles and threads handy. Breaks happen unexpectedly, and having backups will save you time when they do. Choose a high-quality thread that works well with your fabric type to prevent issues down the line.
Adjust tension settings based on the fabric thickness you’re using. A lighter-weight material may require less tension than heavier fabrics like denim or canvas. Dialing in these settings correctly will make a significant difference in stitch quality.
If you’re working on patterns that demand precision, use clear acrylic templates to cut edges accurately. This tool can assist both beginners and seasoned sewists in achieving clean cuts every time.
Don’t hesitate to join online forums or local sewing groups focused on sewing techniques. Sharing experiences and learning from others can provide valuable insights that enhance your skills further.
With practice, patience, and these handy tips, you’ll soon create beautifully finished seams like a pro! Enjoy exploring all your Juki Overlock Serger offers as you dive deeper into this rewarding craft.